Sunday 29 April 2012

Review: New Track Gear

Finally bought new track gear yesterday! And not only that, I managed to influence Yi Yang to buy a new set too! I should definitely change my job and work as a motorcycle gear salesman heh. Yi Yang offered to drive me to Regina and we arrived there at about 1:30pm. It was crowded as usual but it did not take long for the salesman to recognize us from the previous night. Yi Yang and I went to Regina the night before, after work, to try on Alpinestars suit sizes. I'm 1.77m tall and weigh about 75kg, I wear a Alpinestars size 52.

We wanted to try the sizing again, this time with everything on, gloves, boots and back protector. There were a lot of people in the shop but there were only 3 salesman attending to everyone. So we waited around 40 minutes for the salesman whose name I forgot, to be relieved of the hordes of customers. He is the one who like to call his customers 'blah der' aka 'brother'. He then brought us to the Alpinestars outlet, just the corner. The outlet is usually closed, you need to get a Regina salesman to open it up for you.

I think it took us 30 minutes just to put on all the gear haha, suits are pretty darn heavy!

I was happy with the colours of the gear they had to offer, which happened to match my R6's paintwork. Here's what I bought.

Alpinestars Trigger 1 Piece Leather Suit - SGD$800
This is one of Alpinestars entry level suits, it comes with a sport hump and the front of the suit has a lot of perforation. It should ventilate quite well when riding, I will let you guys know after I take it out for a ride.

Alpinestars Trigger 1 Piece Leather Suit

Alpinestars GP Pro Gloves - SGD$300
Taken off www.alpinestars.com, which pretty much sums up the quality of this pair of gloves.
"Nicky Hayden and Carlos Checa are just a couple of the world-class riders that have provided direct input into the design and development of the Alpinestars GP Pro Leather Racing Gloves. They accept nothing less than the best and neither should you."

Alpinestars GP Pro Gloves

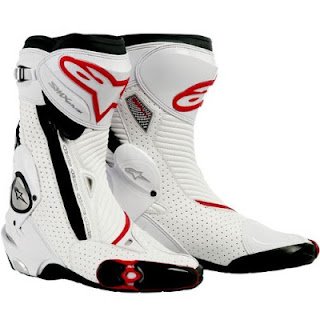
Alpinestars S-MX Plus Boots - SGD$360
The S-MX Plus is the second highest grade race boots available from Alpinestars. The toe sliders are replaceable and there is a lot of perforation at the front of the boot which means well-ventilated feet! Your friends are going to be very grateful the next time you take off your boots. 

Alpinestars S-MX Plus Boots

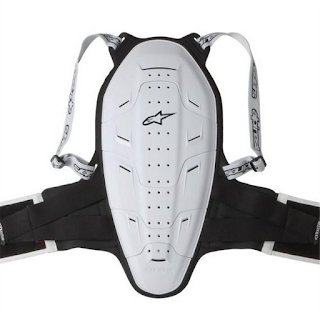
Alpinestars Bionic Back Protector - SGD$200
This is probably the most important piece of the lot. You can break your arms, your legs but not your spine. The back protector's primary function is to absorb impact and prevent your spine from overextending backwards. It comes in 4 sizes, S, M, L, XL I'm wearing an L.

Alpinestars Bionic Back Protector

Very satisfied with my purchases. I will post another review after having wore them on the track. Stay tuned for my next post and ride safe!

Thursday 26 April 2012

Review: OGK Magnetic Tank Bag

Just got my OGK Magnetic Tank Bag delivered to me moments ago. I got it from www.helmetboys.com at SGD$55. In my opinion, it is very cheap, probably one of the cheapest, if not, the cheapest magnetic tank bag big enough to store a full face helmet.

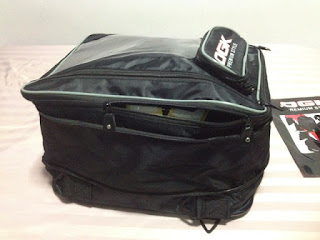
Here's how the tank bag looks like.

OGK Magnetic Tank Bag

The compartments.

OGK Magnetic Tank Bag outer compartment

OGK Magnetic Tank Bag inner compartment

With my full face helmet in the bag, it looks humongous! But who cares? It's a SGD$55 magnetic tank bag that can carry a full face helmet!

OGK Magnetic Tank Bag with full face helmet

It comes with a multi-purpose strap that converts the tank bag into a backpack or sling bag, depending on where you attach the ends to. Pretty neat if you ask me.

OGK Magnetic Tank Bag back straps

OGK Magnetic Tank Bag sling strap

And here's how the magnets look like. The bag comes with 8 strong magnets, 4 on each side flap, in their own compartment. The magnets can be replaced but there is no reason to, unless you eat them.

OGK Magnetic Tank Bag magnets

You open both flaps and let the magnets do their work on each side of your bike's tank. I like how it looks on my bike heh.

OGK Magnetic Tank Bag on Yamaha R6 2011

OGK Magnetic Tank Bag on Yamaha R6 2011

This is probably the shortest product review I've ever written. Because this product is simply amazing and value for money! I am going to ride with it carrying my laptop to work tomorrow. Will let you guys know if it falls off the bike haha.

Tomorrow evening, I'll be going to Regina at Kelantan Lane to try fitting for a Alpinestars Trigger one piece suit. Yi Yang and Rafie might be joining me. It is an entry level suit. Last I checked from Regina, they are retailing at SGD$800. The official price on http://www.alpinestars.com/ is USD$799.95! If I like the suit, I'll buy it on Saturday and post a review. 

Stay tuned and ride safe!

Tuesday 24 April 2012

Body Posture & Positioning

When I was still riding my ZX150KRR, I found it almost impossible to get into a comfortable body posture. I'm standing at a hefty 177cm tall and the bike was just too small for me. Either I was doing it all wrong or I just could not get into a comfortable body posture on that bike when negotiating corners or on the straights. Definitely one of the reasons I was dying to get my hands on a real sports bike.

The standard riding posture of the R6 is very aggressive, probably the most aggressive and back-breaking of all the Japanese Supersport Bikes. However, because you're always in an aggressive posture, it is very easy to go from full tuck in the straights to sliding your butt out in preparation for a corner.

I leave 1 butt cheek off the seat as I find that to be the most comfortable. With 1 butt cheek off the seat, it becomes almost natural to open up your inside legs, just like how the MotoGP guys do it. Over the years, I've picked up valuable body posture advice from friends, forums, videos and whatever I could lay my hands on. I'm going to summarise and share the important bits with you.

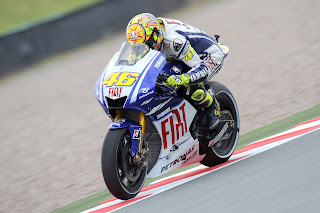
1. Ride with your toes on the foot pegs. In a full tuck, it is more comfortable to rest your toes on the foot pegs than resting the balls of your feet or worst, your heels on the foot pegs. You can see Valentino Rossi resting his toes on the foot pegs in this photo.

Valentino Rossi on MotoGP Yamaha at full tuck

2. In a full tuck, rest your chest on your fuel tank, it is slanted from your crotch up to the fuel cap for that reason. Here's a pretty good example.

Valentino Rossi on MotoGP Ducati head resting on tank

3. Rest your chin on the fuel tank, somewhere in front of the fuel cap. Depending on your bike and your height, you might have to sit further back or in front to achieve this. See the above photo again for an example.

4. While negotiating a corner, your inside toes should be on the foot pegs and the heels of your feet locked onto your heel guard. By doing this, you naturally angle your knees out like a professional racer. Notice Casey Stoner's inside heel in this photo.

Casey Stoner on MotoGP Honda drift

5. Lock your outside thigh to the fuel tank and your outside heel to the heel guard. Combine this with locking your inside heels to the heel guard, you form a steady leaning posture.

All of the above is a general guide, it is a my personal preference. You may adjust your posture until you feel comfortable with it. That is the most important, a comfortable rider would definitely go faster than a rider who feels awkwardly out of place. With the proper amount of practice, you would start riding like Ben Spies in no time!

Ben Spies on WSBK Sterilgarda Yamaha at maximum lean

Before ending this post, take a look at this YouTube video that gives a good explanation on cornering posture. I can't get it to play in full screen, if you encounter the same problem, just right-click on the video and select 'Watch on YouTube'.


That's all for this evening. Ride safe!

Hel Brake Line Defect

I ordered a full set of Hel brake lines for my R6 from a certain workshop in Alexandra Village around Chinese New Year and they only arrived about 1 month ago. That is about a 2-month waiting time for them to arrive!

But that wasn't the issue. I had the brake lines installed at the same workshop. When the mechanic was installing the brake lines, I was not there all the time to check on what he was doing,  that was a fault on my part. ALWAYS look at what your mechanic does to your bike, that is rule number 1 for every servicing done in Singapore. Why wasn't I there to check on the mechanic? Because Yi Yang was at Juzz Wheels, and it was the first time I saw his CBR600RR. So Yi Yang, you have a part to play in my negligence haha!

Okay, so I rode off with the new brake lines and did not inspect anything. First thing I noticed was that the brake lever was very stiff, but I attributed that to the good quality steel braided brake lines and high performance EBC HH brake pads. That's the second fault. NEVER assume, if anything is amiss, stop and check! Especially if you're riding a motorcycle. A faulty car will only leave you stranded, a faulty motorcycle could cause you your life.

Thank god I did not crash in the coming 1 month until I discovered what was wrong, I guess my lucky stars were working very hard. Big thank you to all the angels looking after me!

1 month later, which was last Saturday, I brought my R6 to HKL at Alexandra Village to install the Akrapovic slip-on. While the mechanic was working on my exhaust, he noticed that my brake caliper's bleed screw was missing. I don't have a photo of my bleed screw, but this is how one looks like.

Bleed screw

Technically, if the bleed screw is missing, and you depress the brake lever, brake fluid should gush out of your brake caliper. But that wasn't the case for me. The mechanic who installed my Hel brake lines should have noticed this while bleeding the front brake system, and it should have sounded the alarm bells. But either he does not understand how brake systems work or he chose to keep it from me. In either case, I am never going back to that workshop for servicing again.

Back to HKL. Because they were about to close for the day, I was advised to leave my bike with them but I declined. Stupid move but I couldn't stand the thought of having to travel on Singapore's public transport.

I was still paranoid so I made my way to Unique Motorsports at Toh Guan, they close at 8pm. I arrived at 7pm and was only attended to at 7.30pm. When I told the mechanic my problem, he got mad at me for not noticing it earlier. *Shrugs* But then, it was also too late to do any troubleshooting and I left the place after buying a new bleed screw to cover up the hole. That little thing cost me SGD$35, ouch!

I took the day off yesterday and went back to HKL first thing in the morning. The mechanic removed the brake line of the brake caliper in question and we discovered this.

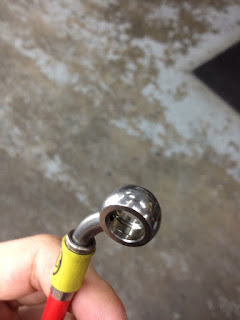
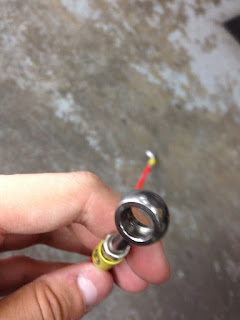
Proper HEL brake line end with holeFaulty HEL brake line end without hole

The photos show both ends of the brake line. Notice that in the left photo, there is a hole for brake fluid to flow through the brake line. In the right photo, there is no such hole! Which explains why no brake fluid was flowing out of the bleed hole. This is a very rare manufacturer defect, but nonetheless, the mechanic who installed them should have noticed it when he was bleeding my brake lines! So, the whole time, my front brakes were only engaging one front brake caliper instead of 2. How could I have not realised that for 1 month!?

Being the perfectionist me, I decided not to use Hel brake lines and asked HKL to install a set of Venhill brake lines, 2 front and 1 rear. Total cost including RBF600 Motul brake fluid was $240+$50=SGD$290. On top of that, since I was already spending so much money, I also got them to set up my suspension, that cost me an additional SGD$40. I left HKL as a very satisfied customer.

This is becoming a really long post but there are a few things that should have been done to prevent this from happening.
1. I should have checked on the mechanic when he was working on my bike.
2. I should have noticed the stiffness in my brake lever and went back to the mechanic.
3. I should have checked the parts that were touched during the servicing to make sure that every single screw, nut, bolt was back in their place.

I will be posting my outings with Yi Yang and Rafie soon. Until then, ride safe!

Monday 23 April 2012

First Post

Let me write the first post by saying a little about who I am and my riding experience. I'm 27 this year and I have been riding motorcycles since 2004. I live in Singapore.

My first bike was a Kawasaki ZX150KRR, and I rode that workhorse for a good 7 years before trading it in for the 2011 Yamaha R6 last year.

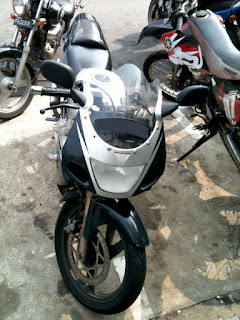
The photo on the left shows my ZX150KRR, taken just before handing the keys over to the bikeshop. The one on the right shows my R6, taken at Juzz Wheels at Alexandra village after giving it a good wash. I highly recommend Juzz Wheels to wash your bikes, the prices are not exactly very cheap but they do a really good job! If I remember correctly, it was SGD$40 for Class 2* bikes and an additional SGD$15 for cleaning the chain and sprocket.

My Kawasaki ZX150KRRMy 2011 Yamaha R6

The photo of the R6 is not recent though, it was fully stock when the photo was taken. Since then, I've changed the following parts: Zero Gravity Corsa Windshield, Akrapovic Carbon Slip-on, Venhill Brake Lines, EBC HH Brake Pads.

I was using Hel Brake Lines for about 1 month before I switched to Venhill, more about that in another post.

I have a more recent photo somewhere... Found it! This was taken the same day I installed the Akrapovic slip-on.

Akrapovic Slip-on for 2011 Yamaha R6

I often go to Johor Bahru with 2 of my friends, Yi Yang on a Honda CBR600RR and Rafie on a Suzuki GSX-R600. Not just for the cheap petrol, but also for the occasional high-speed blasts, I keep lying to myself that it keeps the engine healthy heh.

This photo was taken with a Samsung S2 I think.

The gang. Honda CBR600RR, Yamaha R6, Suzuki GSX-R600.

I hope this makes a good first post. I will be posting very often, lots of stories to share. The next post will be on the reason why I changed from Hel to Venhill brake lines.

Signing off with this anonymous quote: Straight roads separate the rich from the poor. Corners separate the men from the boys.

*For you out there who are not from Singapore, the licensing system for motorcycles here is split into 3 classes, namely Class 2B, 2A and 2, in that order.
The restrictions imposed on the different classes are:
2B: motorcycles =< 200cc
2A: motorcycles <= 400cc
2: motorcycles > 400cc
There is a 1 year probation upon getting each Class, except Class 2, for one to be eligible to take the lessons/test for the next Class. For example, assuming I just got my 2B, I have to wait for 1 year before I am able to acquire my 2A license. The R6 requires a Class 2 license here.