Thursday 12 December 2013

How to: Pimp Your Motorcycle for Christmas

I spent last Christmas lying on a hospital bed with a broken elbow, thinking about what I would do if I wasn't injured.

Well, this is one year late, but better late than never! Here's the result of a few zip ties and a SGD$9.90 car antlers set from Cold Storage.


Looking forward to a merry Christmas!

Ride safe!

Sunday 24 November 2013

Review: Stomp Grip

So, the R6 has been back from the workshop for a week now. And it was time to 'decorate' it with goodies. First item on the list, tank grips!

As you know, I used TechSpec previously but I have decided to switch to Stomp Grip. Mainly because the R6 is going to be more of a track bike from now on. But why? Because I recently bought a used 2005 Honda Wave 125 R to be my commuter bike.

Installation
Alright, on to business! The Stomp Grip installation instructions recommend to use a hair dryer or heat gun to heat up the tank grips and fuel tank for easier installation. Unfortunately for me, I could not find a power socket in my car park, so the next best solution was leave my bike under the hot sun for a while.


The Stomp Grip tank grips are notorious for their difficult installation with minimal air bubbles, and I say minimal because it is almost damn near impossible to install with zero air bubbles! So before installation, I consulted the Internet's best resource for advice, YouTube.

And I found this.


Armed with expert advice, I tried my hand, or rather, thumb at the installation.


And that is the better side. As you can see, there are still tiny bubbles trapped underneath. I am too ashamed of myself to upload a photo of the left side, it is quite horrible. No thanks to my blistered thumb. If you can, take a one hour break to rest your sore thumb before you install the other side. I took about 20 minutes for each side.

Price
I could not find the clear version of Stomp Grip for my R6 in Singapore so I had to order online, and it cost me quite a bomb after shipping. Ideally, it should cost you about SGD$70 before shipping.

Conclusion
Actually, you can't really notice the air bubbles standing 2 metres away, you have to be really close to be able to see them. Track bikes don't need to look pretty anyway, no biggie.


Thumbs up to you if you noticed the new Akrapovic sticker on the exhaust.

Stomp Grip should be your first choice if you don't ride on the streets often, they are not as comfortable as TechSpec tank grips for daily street commuting. However, if you ride on the track, the feedback that they provide is just phenomenal against the TechSpec. There is no clear winner here, you have to decide which tank grip to get depending on your needs.

RB Rating: 8 / 10

Bonus photo of my Honda Wave 125 R.


Ride safe.

Wednesday 13 November 2013

Elbow Grease

Elbow Grease
n. Informal
Strenuous physical labor and effort.

If you have been following my posts, you would know that I had a little excursion off the racetrack recently. I was unhurt, but I can't say the same for my Akrapovic slip-on exhaust.

Here's how it looked like after the crash.


The sight of that would turn all grown men to weeping little pansies. Not that I literally cried, just figuratively saying. The scratch marks did not looked salvageable, and the next step would be to either spend another SGD$1250 to get a new slip-on or just live with the ugly one.

But the good people at HKL did some magic, the magic that is elbow grease. I'm not sure how much effort they spent, but with their hardcore polishing skills, they restored my slip-on to what it looks like now.


Pretty damn impressive I must say! The R6 is ready by this week, more updates soon.

Till then, ride safe.

Sunday 27 October 2013

Crash in Gravel Trap

It was a beautiful Saturday morning, I was still on my warm up lap, and the tyres were still cold. While leaned over at turn eight of Johor Circuit, the rear tyre lost grip momentarily, and I fell off the seat of my 2011 Yamaha R6. Managed to kick myself back onto the seat but it was too late, I was headed for the gravel trap, with a bike that was still slightly leaned over. Within seconds, I lost control and got ejected off the bike.

Oh well, it was time to pay my 'school fees'. Here's the video of the crash.


Ride safe.

Monday 14 October 2013

MotoGP 2013: Sepang

Just came back from MotoGP 2013 at the Sepang International Circuit. You can see some of the photos here or catch the full album at the Facebook Page.


Ride safe.

Sunday 28 July 2013

How to: Go to Johor Circuit from Singapore and back

I've made video turn-by-turn navigation guides on how to go to Johor Circuit from Singapore, and how to go back to Singapore from Johor Circuit.

Check out the uploaded videos on YouTube.

From Singapore to Johor Circuit

From Johor Circuit to Singapore

Ride safe.

Wednesday 17 July 2013

Review: Ohlins Steering Damper SD 020

I've been procrastinating the purchase of a steering damper for a really long time. Until recently, where I pushed hard enough while exiting a corner at the track and experienced a mild acceleration head-shake. Head-shakes can be caused by uneven surface, improper suspension setup, incorrect throttle inputs, and many other reasons. Most of the problems can be resolved by improving bike setup and rider skill, but you cannot fix surface imperfections. That's where a steering damper comes in handy, to save you from the dreaded tank-slapper.

I finally bought a steering damper. Not just any steering damper, but an Ohlins Steering Damper SD 020 for the Yamaha R6. Ohlins, a world-renowned suspension company, used predominately by the best race teams in MotoGP and WSBK, there is no question about their quality.

The Steering Damper
Everything you need for installation comes in the box. Just follow the instructions and install, a simple 10-minute job. Damping adjustment is done by turning a knob, which is conveniently on the side of your clutch hand, you can adjust it on the fly to accommodate to changing road conditions.


Adjustment
The steering damper has an adjustment range of 18 clicks.  Turning the adjustment knob clockwise increases the damping, making it harder to steer; turning it counterclockwise decreases the damping, making it easier to steer. The owner's manual recommends an initial setting of 10 clicks from full clockwise. The recommended settings should work as a starting point to fine tune to your preference and road conditions.

Ideally, a steering damper should not hinder the operation of your motorcycle, and only react when it needs to. At the recommended settings, it seems to perform just fine. If you hit a bump hard enough, the steering damper should be able to react to prevent a tank-slapper from occurring.

Functionality
It does its job extremely well, period.

Price
The Ohlins Steering Damper SD 020 costs SGD$900. This is slightly more expensive than the previous model which did not come with the installation brackets. If you do your sums by adding the price of the older steering damper and custom brackets, it works out to be about the same, except that you have Ohlins branded brackets now.

Conclusion
A steering damper is not just for track riders, it is especially more important for street riders because of varying road conditions (e.g. pot holes). Race tracks are generally smoother, and are the same every lap. Public roads can be treacherous, and can differ every time you  go past the same stretch of road. Invest in a good steering damper like the Ohlins', it could have prevented the terrifying tank-slapper in the video below.


RB Rating: 10 / 10

Ride safe.

Monday 8 July 2013

Review: Pirelli Diablo Supercorsa SC2 V2

The Pirelli Diablo Supercorsa SC2 has been updated for 2013, and I am glad I fitted a set to my R6. For easier identification, the updated Diablo Supercorsa has an additional "V2" suffix to its name.

The Tyre
Diablo Supercorsas have been known for their excellent dry grip at breakneck cornering speeds, if you need a reference for that, go watch WSS races. The Pirelli Diablo Supercorsa SC series are race compound tyres, the same tyres that WSS race teams are using for their race bikes.

On first look, you would notice two distinct differences from the previous Diablo Supercorsas. Firstly, there is an embossed name on each side of the slick shoulder of the rear tyre, at the contact area where you are at maximum lean.


Secondly, and the most obvious change is the updated tread design, termed the single element tread design. This new tread design looks like streaks of lightning, and are more concentrated towards the centre of the tyre.


Grip & Handling
With less tread on the side of the tyres, the "naked" area of the slick shoulders are now 24% wider than the previous Diablo Supercorsas. The new Diablo Supercorsa provides a larger contact patch and increased grip at steep lean angles, which is an impressive update to a tyre that has been known to provide impeccable grip while leaned over.

The new 120/70 ZR17 front tyre has a 4 mm wider profile than its predecessor, which makes the front end feel slightly more predictable at maximum lean.

Practicality
From my own experience, the harder Diablo Supercorsa SC2 compound works well in Southeast Asia's hot climate. Pirelli also manufactures a SP version of the Diablo Supercorsa, which is a slightly more street oriented tyre. The Diablo Supercorsa SP favours tyre longevity over grip, and is still capable of handling a few track days. Personally, I would recommend the SC2 compound, to have the best grip available when you need it the most, especially at blistering speeds on the race track.

I use SC2s on the streets too, with a higher tire pressure to reduce tyre wear. Something like 32 PSI front and 29 PSI rear seems to suit my street riding style. My last pair of Diablo Supercorsa SC2s lasted me about 10,000 km, including 5 track days over 6 months of use. Though I must admit the grip on the last track day was not very confidence inspiring.

In the wet, I would be very careful with Diablo Supercorsas, including the SP version. On a wet track, Diablo Supercorsas should not even be on your consideration list, they are horrible in wet conditions. You should be fine with them on the street though, if you ride sensibly. Just use less lean angle (you shouldn't be scraping knee pucks on the street anyway), leave more room for braking, and you will finish the ride safe and sound.

Price
A 120/70 ZR17 front tyre and a 180/60 ZR17 rear tyre cost me SGD$550, including installation and balancing at HKL. Yes, it is expensive, but I would rather pay the difference to get the best grip that I can afford, than to spend more money repairing my bike after lowsiding it with a mediocre tyre.

Conclusion
If you are looking for the best track oriented tyre, look no further. If you are already a Pirelli Diablo Supercorsa fan, then get yourself the updated tyres and feel the difference. Don't judge based on my opinions, look at the WSS racers, and judge for yourselves.

RB Rating: 10 / 10

Ride safe.

Tuesday 25 June 2013

Review: R&G Hexagonal Exhaust Protector

Dropping your motorcycle is a very unpleasant experience, be it a minor stationary drop or a crash. If your motorcycle lands on the side with the exhaust, you can be sure that the repair bill would be substantially higher. Especially if you ride on the track, lowsides are very common, and anything that can minimize damage to your exhaust should be on your consideration list.

There are quite a few reputable brands out there that manufacture exhaust protectors, one of the more popular brands being R&G. Being someone who wants only the best for his bike, I got myself a R&G Hexgonal Exhaust Protector.

The Exhaust Protector
There are a variety of shapes of exhaust protectors from the R&G exhaust protector product family. I bought the hexagonal exhaust protector specifically for my Akrapovic hexagonal exhaust end-can.

The R&G Hexgonal Exhaust Protector is one of the better looking exhaust protectors I've come across, and according to unfortunate track riders who have crash tested the product, they have feedback that it holds up pretty well in a crash. But like all motorcycle protection parts, it is not guaranteed to protect against all crashes. Every crash is different, but the exhaust protector should be able to protect your exhaust end-can against all but the most violent of crashes.


Packaging & Installation
It came in a small box, together with the installation guide. Installation was pretty straightforward, no special tools were required. Just follow the instructions carefully and you would be fine.


Price
The R&G Hexagonal Exhaust Protector retails at SGD$78, which is a little on the high side. But if you think about it, it's cheap insurance for your exhaust end-can.

Verdict
You can probably get cheaper non-branded exhaust protectors for a fraction of the price of the R&G. As far as rider reviews go, there is no significant advantage from the R&G exhaust protector over cheap rubber alternatives. Perhaps, it can withstand a more violent crash but that is a scenario that is difficult to simulate.

Because brands have a reputation to upkeep, it would be silly to release an inferior product to the mass market without proper research and development. I would recommend that you spend that little more money to get a R&G exhaust protector for peace of mind.

RB Rating: 7 / 10

Ride safe.

Sunday 16 June 2013

Riders for Life #3

The third episode of the "Riders for Life" series includes footage from the recent Singapore Ride Safe 2013 event.


Ride safe.

Sunday 9 June 2013

Sudden RPM Drop on Downshift

Something weird happened to my R6 on the track recently. Upon downshifting from third to second, while braking, the revs dropped suddenly, and forced me to ride into the gravel trap. I'm still not sure what could have been the cause, but the bike has been running perfectly fine ever since.


Ride safe.

Wednesday 29 May 2013

Review: LighTech Rear Sets FTRYA002

In order to tailor your motorcycle controls to your body, the first upgrade you need to buy should be a good set of aftermarket rear sets. I was torn between the LighTech and Vortex rear sets. Vortex make really good rear sets, and are very popular among a lot of track junkies. Vortex pegs have a very aggressive design to give maximum grip,  preventing slippage which can be potentially dangerous especially while leaned over. But that was also one of the reasons I chose the LighTech instead, Vortex pegs tend to 'eat' into your rubber soles, and I did not want to destroy the soles of the leather dress shoes I wear to work.

The Rear Sets
For my 2011 Yamaha R6, I got the FTRYA002. You may want to check LighTech's website to find out which model suits your bike.


Inside the packaging, you'll find the rear sets, the necessary nuts and bolts, and the installation manual. The installation is pretty straightforward, but I would recommend that you let an experienced mechanic do the job if you're not confident.

Adjustability
The pegs can be configured to 1 of the 8 possible positions, 2 levels for height, and 4 positions for forward and backward adjustability.


I stand at 1.77m  tall or about 5"10, and I wouldn't recommend the LighTech if you're a lot shorter than I am because you would probably need 1 more level of height adjustability. The peg position seen in the photos above is comfortable for me for track riding, and works for street riding too with just a bit of discomfort. This is how I remind myself that the R6 is meant for the track, not the streets. Or maybe I'm just too lazy to keep switching the peg positions.

Grip
The grip is excellent. I have been riding with the LighTech rear sets for about 3 months now, and have been to the race track twice. No slippage, not even in heavy rain with my leather dress shoes. What can be better? The soles of my shoes still look the same, no signs of wear and tear caused by the pegs.

Features
The gear shifter on my R6 has been configured for GP shift, or reverse shift. LighTech states this as a feature in their specifications, but to me, it's just simply flipping the pivot of the shifter rod around.

Zoom in on the top left part of the photo below to locate the metallic pivot of the shifter rod, which is pointing to the right, or rear of the bike. For regular shifting, the pivot should be pointing to the left, or front of the bike.


Unfortunately, the shifter rod when configured for GP shift, would rub against the stock R6 plastics. I had to cut a small section to make space for the shifter rod. See photo below to understand what I mean.


Price
The rear sets were SGD$660. I ride the bike on the streets too, so add in an additional SGD$70 for the rear brake light switch, which brings the total amount to $730. I must admit it's not a cheap investment but it is the one of the best upgrades I have made to my R6. Good control ergonomics prevents you from tiring out too quickly, and that translate to more confidence because you feel at ease on the bike.

Verdict
LightTech rear sets are one of the best rear sets that money can buy, they are used in some of the best teams (Tech 3 Yamaha) in MotoGP, SBK, and by many other pro-level race teams. There is no doubt that LighTech makes quality rear sets.

The only gripe I have about them are the lack of 1 more level of height adjustability. Other than that, they are pretty much perfect.

One more thing that I like about LighTech rear sets is that the parts can be bought separately. In the event of a crash, you would just need to replace the damaged part and not the whole rear set.

Also, check out a video of the rear sets in action.


The LighTech rear sets deserve a good rating.

RB Rating: 8 / 10

Ride safe.

Tuesday 21 May 2013

Riders for Life #2

The second installment of the "Riders for Life" series. Includes footages of the recently reviewed Dainese gear, and my first track session after the major highside injury.


Ride safe.

Review: Dainese Aero Evo Race Suit

I've reviewed all the other Dainese gear that I bought, the Dainese Full Metal RS gloves, Dainese Axial Pro In boots, and Dainese Wave Air back protector. In this post, I review the final piece, the race suit.

So I got myself a Dainese Aero Evo Race Suit, new for the 2013 Dainese catalogue.


The Suit
The Aero Evo is not like your traditional race suit, the zip does not run down the middle of your chest. It is a W-frame race suit, which means that it has 2 zips that run from the top of the suit down to both sides of your hips.


Getting in and out of the Aero Evo takes a little practice for the uninitiated. The Aero Evo inner liner is not removable. The inner liner at the chest and back is something called a 3D bubble liner; it leaves a pocket of air between you and the suit. And we all know what that does, improved air circulation! For those of you who know that I sweat a lot, the 3D bubble liner is going to help me a long way. As for cleaning the suit, I guess that's the down side, I'll probably have to take it to get it professionally cleaned everytime it starts to smell funky.

The Aero Evo comes with a full race hump, ideal for full tuck ventilation.


And finally, as mentioned in my previous reviews on Dainese products, Dainese does not manufacture their products, other than their boots, in Italy anymore. Which is still a shame really, if not for the high costs. The Aero Evo is made in the Ukraine, and I've yet to find any faults with it.

Fit
I'm 1.77m tall, weighing at about 80kg. I have a slim figure with a 36" chest and 32" waist, and I wear a size 50. The fit is very snug, but once you're in the suit, it feels like wearing your own skin. This is something that my discarded Alpinestars Trigger didn't succeed in, the fit on the Trigger was bulky, and made walking a little awkward. All I can say is that Dainese fits me better.

Protection
The race suit has shoulder, elbow and knee titanium sliders. These sliders not only reduce the force on impact but also aids in sliding. That's why they are called sliders. During a fall, leather parts can cause a grip and flip effect on the tarmac, and cause you to tumble, which can hurt quite a lot. Metal parts tend to slide on tarmac; sliding is less dramatic and painful.


The Aero Evo also includes your traditional under-suit armour in the shoulders, elbows and forearms, and knees and shins. The armour is non-removable. I wouldn't recommend you to remove any armour even if it was removable though.

Features
The race hump is able to accommodate a Dainese Water Bag Kit, which unfortunately does not come with the suit. But I'm glad to know that in the event that I need it, the Aero Evo is able to take one.


The race suit is also able to take in Dainese In boots. This is the Dainese technology that allows the race suit's calf area to be worn on top of the race boots. See my review of the Dainese Axial Pro In Boots to understand how this technology works.

Price
I bought the suit at SGD$2000 from JR. Very close to the retail price of USD$1549.95 price tag listed on the Dainese official site. The price is a little steep but hey, it's the only other 1-piece race suit in the Dainese catalogue that has shoulder, elbow and knee titanium sliders. Can't complain. It is a very high end Dainese race suit that is feature-rich, and it's 2013 design.

Verdict
For a race suit so high up in the Dainese food chain, it definitely lives up to the brand's standards. The Dainese Aero Evo should be a popular race suit for both hardcore and casual riders in 2013. The unconventional double-zip design is an innovative breath of fresh air to the standard design.

For its price, the Aero Evo offers unparallel protection and comfort, the shoulder, elbow and knee sliders are a must for hardcore track riders.

Do remember to check out the other Dainese gear reviews if you have not. And lastly, check out what RevZilla has to say about the Dainese Aero Evo Race Suit.


Another great product from Dainese!

RB Rating: 9 / 10

Ride safe.

Sunday 19 May 2013

Review: Dainese Wave Air Back Protector

Did you know that Dainese invented the back protector? Over the years, Dainese has perfected the back protector, protecting riders from serious spinal injuries, it's no wonder some of the top riders in the world choose Dainese.

In the pursuit of my new Dainese track gear, I bought the Dainese Wave Air back protector.

The Back Protector
This is the exact same back protector that top level riders, such as Valentino Rossi, wear for racing. Even though no one is going to see your back protector under your race suit, Dainese made the extra effort to make the Wave Air look absolutely gorgeous, like all of their products.


Fit
The fit feels similar to my retired Alpinestars Bionic Back Protector, except that the Dainese Wave Air is a little more comfortable because I bought the correct size this time. Ask your sales person for advice on the size that you should be wearing. A good gauge would be to put on the back protector, with the waist strap comfortably secured to your waist, the top of the back protector should be about 2 inches below the collar of your t-shirt.

The waist strap is a double velcro system, like majority of the back protectors in the market. Wear the long waist strap around your waist, and use the short elastic waist strap to secure the position.

Protection
The back protector serves only a single purpose, and that is to protect your spine. What you don't see in the photo below is the honeycomb core that is between the 3D bubble liner and the plastic outer shell. The honeycomb core is designed to crumple in the presence of impact. Hence, the back protector is a crash-and-done protection.

After a crash, check the plastic outer shell for cracks, and inspect the honeycomb core for dents. If you find either one of those two symptoms, throw the back protector away and buy a new one, it did its job.

The Wave Air also has energy-absorbing foam along its circumference. That's the webbed looking material surrounding the darker 3D bubble liner in the photo below.


Features
Now, here's something I personally like about the Wave Air. The shoulder straps can be a little uncomfortable to wear under a race suit, so Dainese made them removable. Such a simple idea with so much ergonomic benefits. Under a race suit, there is no need for shoulder straps because the back protector is not going to go anywhere. Two thumbs up to Dainese for this ingenious idea.


Price
JR sold me the Dainese Wave Air for SGD$250. On the official Dainese website, the back protector retails for USD$199.95, I think I got a decent deal.

Verdict
The fit and features are fantastic in my opinion, there is nothing much I could ask for, really.

I can't rate the back protector much on its protection because I don't think I want to crash test it, let the experience of dozens of top level riders who wear the Wave Air and walked away from terrible crashes speak for itself. I am sure the protection is top-notch.

There are more technical back protectors out there which also include neck and scapula protection, but that wouldn't be a fair comparison, well because, the Wave Air was designed to just protect the back.

Overall, it is a great back protector and you should definitely consider it if you're looking for one.

RB Rating: 9 / 10

Finally, the review of the race suit coming next!

Signing off, ride safe.

Saturday 11 May 2013

Review: Dainese Full Metal RS Gloves

I reviewed the Dainese Axial Pro In Boots in my previous post. Continuing on to review the rest of my Dainese track gear, in this post, I review the Dainese Full Metal RS gloves.

The Gloves
The Dainese Full Metal RS is new for the 2013 Dainese catalogue. The Full Metal RS is essentially an upgraded version of the Full Metal Pro, to takeover its place on the top spot of Dainese gloves. Coincidentally, Valentino Rossi is also wearing the Full Metal RS in MotoGP, but of course in his distinctive high-vis colours.


The gloves come in a variety of colours. I chose the white/black/red combination to compliment my Dainese race suit.

Fit & Comfort
I wear a size M Full Metal RS, which is the same size as my Dainese Scalpel Gloves. Good consistent sizing within the brand. It is much easier to slip into the Full Metal RS than the Scalpel, probably because of the softer leather used.

The leather feels very soft and thin when compared to my retired Alpinestars GP Pro gloves. I'm not too sure about the abrasion resistance of the softer leather, but if Rossi's hands can survive crashes with this glove, then it can't be too bad for us mere mortals either. I hope I won't get a chance to test its crash capabilities though.

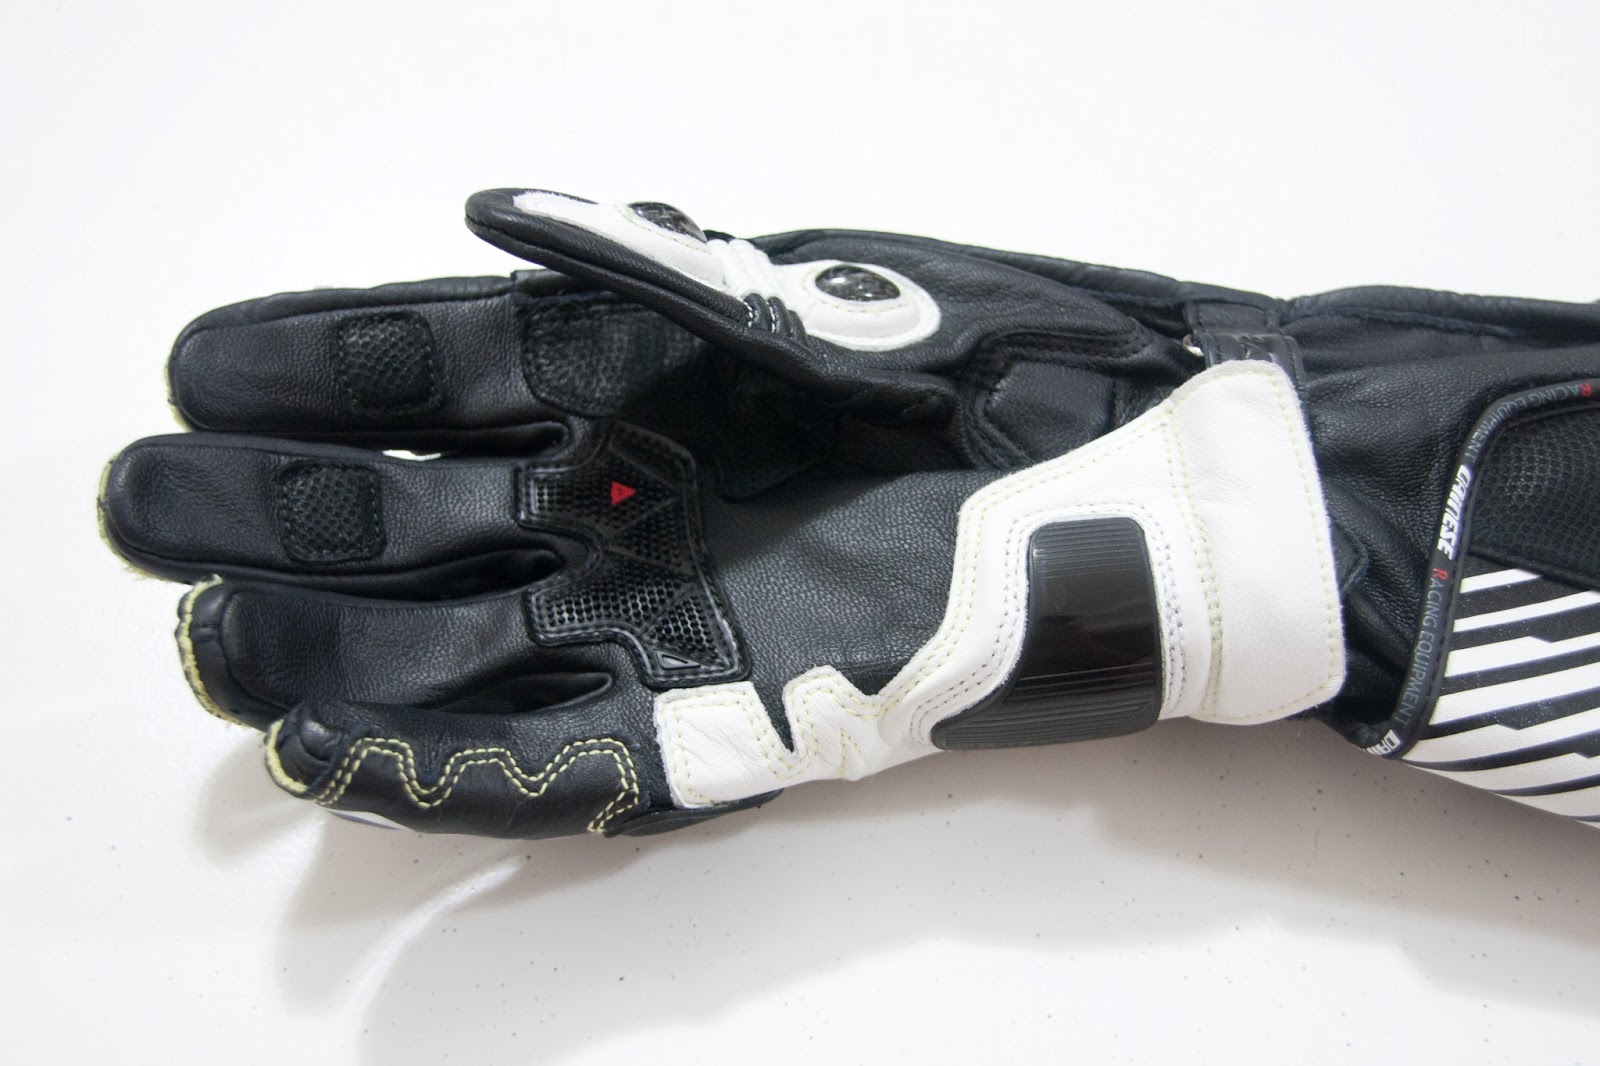
The fit on the gloves feels very comfortable and snug, which is a huge plus point for operating motorcycle controls. Notice the square rubberized panels on the index and middle finger, these are grip panels that help to increase grip and feel for the levers. A different version of the panels are also found on the top of your palm to help with throttle control. These panels are sewn into both the left and right gloves.


Protection
Looking at the photo above, notice the palm slider (in black) located below the little finger. When we fall, most of us instinctively place our hands in front of ourselves to brace. When that happens, combined with the speed at which you are slammed against the hard ground, you will most likely break some bones in your arms and/or hands. That is exactly what happened to me when I highsided last December, and broke a few bones.

The palm slider dissipates the impact forces, and forces your hand to go into a slide which further reduces the impact. Remember, crashing and sliding is unlikely to hurt you much, but crashing and coming to a dead stop sucks.

The Full Metal RS makes use of the Dainese Distortion Control Panel (DCP), which prevents your little finger from hyper-extending (bending in the wrong direction). Ask any hardcore racer and you would most probably see pretty messed up little fingers. The little finger is a common victim in motorcycle crashes. Especially when sliding across the tarmac, it can bend beyond its limit, and dislocate or fracture. Dainese also reinforced the leathers covering the little finger with plastic plates underneath that line up to further protect it from hyper-extension and abrasion.

As for the other fingers, there are sliders to help prevent the 'coming to a dead stop' situation.


Moving on to the back of the gloves, titanium plates on the knuckles and back of the hands, which are reinforced with metal hard parts below them. The titanium not only protects the back of your hands, I think they just look beautifully bad-ass.


Coming to the cuffs of the gloves, we see hard protection on the ulnar side. The ulna bone is another common victim of motorcycle crashes. If you look at at your wrist, below your little finger, you will find the head of the ulna bone. In a lowside, you will most likely land on your side, and that bone is going touch down hard. The added hard protection helps to spread the impact, and reduce the amount of force on your bone.


Price
The Dainese Full Metal RS retails for USD$349.95 at Dainese.com, and I got it for SGD$490 at JR. Not very close to the official retail price, you could perhaps get it for less online if you buy in bulk with a couple of friends and share the shipment cost.

Verdict
As with most Dainese products, unless you're a rich fellow, you're going to find their prices a bit on the high side. You're paying for the brand somewhat, but I convince myself that I'm buying top-grade stylish motorcycle gear.

The soft and thin leather on the Full Metal RS doesn't inspire a lot of confidence, but I suppose it does its job since top level racers are wearing it.

This is actually my second pair of Full Metal RS gloves, the first pair I brought home actually had a seam already busted open at the index finger, and it had just arrived at JR as a new shipment! Dainese imposes that its distributors keep a high level of customer service, and that was probably why JR gladly exchanged them with another new pair, apologizing profusely for the inconvenience.

This experience is probably the effect of Dainese shifting their production lines outside of Italy, therefore I urge you to check your purchases before you leave the store. Overall, I'm quite pleased with the experience because I was given a new pair, no questions asked, without much hassle.

RB Rating: 9 / 10

Next up, review of the Dainese back protector!

Ride safe.